@Rock
Write the image to a USB drive, then boot the system from the USB drive, format EMMC after system startup, and then enter UMS to re burn.
G
Posts
-
RE: Guru, please help me !posted in PI CM5 Laptop
-
RE: Cool Pi Cm5-Laptop Linux Quick Start Guideposted in PI CM5 Laptop
git checkout 6.1.75
./build-kernel.sh arm64
The deb file will be generated in the higher-level directory of the code and copied to the machine for installation.
-
RE: Any other distro booting?posted in PI CM5 Laptop
@petersen77
The compilation of Mesa is closely related to the DRM version, so pay attention to the version. -
RE: Cool Pi Cm5-Laptop Linux Quick Start Guideposted in PI CM5 Laptop
@Momo-0
TYPEC is only related to DTS, and the main issue with the sound card is Tinymix configuration. -
RE: Cool Pi Cm5-Laptop Linux Quick Start Guideposted in PI CM5 Laptop
@Momo-0
The official default configuration of ARMBIN's loadaddr and optee conflicts and needs to be modified to 0x200000
-
RE: Any other distro booting?posted in PI CM5 Laptop
@petersen77
Compile and install mesa24 or higher versions. -
Precautions for MOTION Remote Monitoringposted in Pi Gateway CP1B/CP2B/CP3B/CP3B-P
- Install the motion package
sudo apt install motion -y- Insert USB camera and recognize video node normally
admin@cp2b:~$ ls /dev/ |grep video video0 video1- Modify the following configurations
framerate 60 //Change frame rate to 100 stream_maxrate 60 //Add configuration webcontrol_localhost off //Support remote control stream_localhost off off //Support remote stream- Increase services
sudo systemctl start motion sudo systemctl enable motion sudo reboot- Accessing the camera, please note that HTTPS is not supported
http://you-ip-address:8081
-
RE: Any other distro booting?posted in PI CM5 Laptop
@petersen77
The rc.local script actually only performs simple scaling operations, which can be implemented anywhere in the system, such as creating a service yourself.
Regarding GPU issues, it is necessary to compile and install the latest version of Mesa by oneself. -
Coolpi WIFI Support Listposted in Pi Gateway CP1B/CP2B/CP3B/CP3B-P
Wifi Support List
Model Specifications Manufacturer Interface Supporting Machines RTL8852BE Wi-Fi 6+BT5.2 REALTEK PCIe 2.0 x1、M.2 Key E CM5-AIBOX/CM5-GENBOOK/CP3B/CP3B-HMI10 RTL8822CE Wi-Fi 5+BT5.0 REALTEK PCIe 2.0 x1、M.2 Key E CM5-AIBOX/CM5-GENBOOK/CP3B/CP3B-HMI10 RTL8822BE Wi-Fi 5+BT4.2 REALTEK PCIe 2.0 x1、M.2 Key E CM5-AIBOX/CM5-GENBOOK/CP3B/CP3B-HMI10 RTL8723BE Wi-Fi 4+BT4.0 REALTEK PCIe 1.1 x1、M.2 Key E CM5-AIBOX/CM5-GENBOOK/CP3B/CP3B-HMI10 RTL8188EE Wi-Fi 4 REALTEK PCIe 1.1 x1、M.2 Key E CM5-AIBOX/CM5-GENBOOK/CP3B/CP3B-HMI10 AX210 Wi-Fi 6+BT5.3 INTEL PCIe 2.0 x1、M.2 Key E CM5-AIBOX/CM5-GENBOOK/CP3B/CP3B-HMI10 AC7260 Wi-Fi 5+BT4.2 INTEL PCIe 2.0 x1、M.2 Key E CM5-AIBOX/CM5-GENBOOK/CP3B/CP3B-HMI10 AIC8800-D80 Wi-Fi 6+BT5.0 AIC USB2.0 CP1B/CP2B/CP3B-P MT7601-UN Wi-Fi 4 MediaTek USB2.0 CP1B/CP2B/CP3B-P -
Node-RED Installationposted in Pi Gateway CP1B/CP2B/CP3B/CP3B-P
Installation Based on Physical Machine
sudo apt update
curl -fsSL https://deb.nodesource.com/setup_20.x | sudo -E bash - &&\
sudo apt-get install -y nodejs
sudo apt install  npm
sudo npm install -g --unsafe-perm node-red
Based on Docker
mkdir /home/iotts/node_red
cd /home/iotts/
sudo chmod 777 node_red
sudo docker run -d --restart always -p 1880:1880/tcp -v /home/iotts/node_red:/data --name nodered nodered/node-red
Start on Boot
- Create a service
sudo nano /etc/systemd/system/node-red.service- Paste the following content in the editor:
[Unit] Description=Node-RED After=network.target [Service] ExecStart=/usr/bin/node /usr/bin/node-red User=sa [Install] WantedBy=multi-user.target- Reload the systemd manager configuration to make the new service effective:
sudo systemctl daemon-reload- Start the Node RED service and set it to boot up automatically:
sudo systemctl start node-red sudo systemctl enable node-red- Check the status of Node RED service:
sudo systemctl status node-redSet user password
- Open the settings. js file
vim /home/admin/.node-red/settings.js-
To modify the content of CredentialSecret, you need to set a key, not a login password. Save and exit.

-
Restart Ubuntu
sudo reboot- Generate username and password, using admin as an example here
node-red admin hash-pwadmin@cp2b:~$ node-red admin hash-pw Password: $2y$08$cUm1LgtBnDt.b.az4IiLeuPCNb0LFv.hbnd71OWwd94j.GMF/WVnW-
Open the settings. js file, modify the content of adminAuth, and copy the string from earlier. Save and exit.
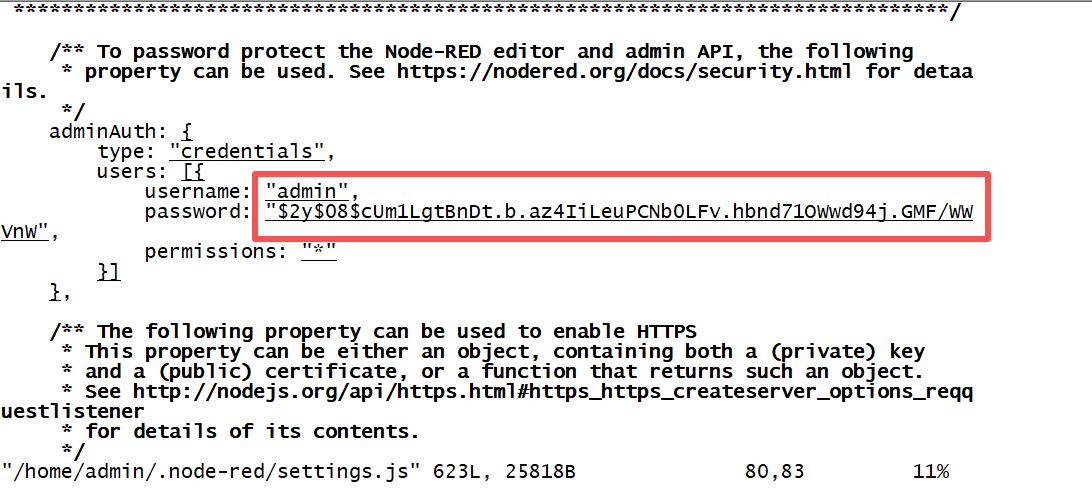
-
Restart Ubuntu

-
RE: Any other distro booting?posted in PI CM5 Laptop
@petersen77
According to the following steps, theoretically all distribution versions can be launched:- Mount the Coolpi style image file in a Linux environment (the image file includes 2 partitions, mount the second partition), back up /etc/rc/local, and then delete all contents.
- Copy the new file system (such as arch) directory to the mount directory.
- Unzip modules. tar. gz(The file is in the first partition of the Coolpi image) to the /lib directory
- Copy /etc/rc.local to the new file system/etc directory
- Mirror flashing to machine startup.
-
AIC8800D80 Enable AP Modeposted in Pi Gateway CP1B/CP2B/CP3B/CP3B-P
- Install hostapd (requires internet connection)
sudo apt install hostapd- Enable encryption mode for 2.4G hotspot
Enter the following content, using the 11ax wireless standard, encryption method WPA-PSK, ssid as hotspot name, and wpa_passphrase as custom password, all of which can be modified
vi /etc/hostapd.confinterface=wlan0 driver=nl80211 ctrl_interface_group=0 ctrl_interface=/var/run/hostapd beacon_int=100 ssid=aic_ax_2.4G country_code=CN channel=6 hw_mode=g ieee80211n=1 ieee80211ac=1 ieee80211ax=1 ht_capab=[HT20][SHORT-GI-20][HT40-][HT40+][SHORT-GI-40] wmm_enabled=1 he_basic_mcs_nss_set=65534 auth_algs=3 wpa=3 wpa_passphrase=1234567890 wpa_key_mgmt=WPA-PSK wpa_pairwise=CCMP rsn_pairwise=CCMP- Add Address Resolution
vi /etc/dnsmasq.conf# Only monitor the AP interface interface=wlan0 bind-interfaces # DHCP configuration dhcp-range=192.168.11.2,192.168.11.20,255.255.255.0,24h dhcp-option=3,192.168.11.1 dhcp-option=6,8.8.8.8,114.114.114.114 resolv-file=/etc/dnsmasq/resolv.conf- Create /etc/dnsmasq/resol.conf
mkdir -p /etc/dnsmasq
vi /etc/dnsmasq/resolv.conf
Enter the following content
nameserver 8.8.8.8 nameserver 8.8.4.4- Create script to enable AP mode
vi /usr/bin/start_wifi_ap.shEnter the following content
#!/bin/bash
#
## Search for network interfaces starting with wlan
WIFI_IFACE=wlan0

# Configure IP address
ifconfig $WIFI_IFACE 192.168.11.1 up

# Start hostapd
hostapd /etc/hostapd.conf -dd &

# Start dnsmasq
touch /var/lib/misc/udhcp.leases
dnsmasq -i $WIFI_IFACE -C /etc/dnsmasq.conf &

echo "AIC WiFi AP started on interface $WIFI_IFACE"
Modify permissions
chmod a+x /usr/bin/start_wifi_ap.sh- Add IP forwarding rules
sudo sh -c "echo 1 > /proc/sys/net/ipv4/ip_forward"- Edit /etc/sysctl.d/10-network-security.conf and add the following line
net.ipv4.ip_forward=1- Effective operation
sudo sysctl -p- Download Iptables (requires internet connection, can be skipped if installed at the top)
sudo apt update sudo apt install iptables-persistent sudo apt install iptables- Add rule
sudo update-alternatives --set iptables /usr/sbin/iptables-legacy sudo update-alternatives --set ip6tables /usr/sbin/ip6tables-legacy iptables -t nat -A POSTROUTING -o eth0 -j MASQUERADE sudo iptables -A FORWARD -i wlan0 -o eth0 -j ACCEPT sudo iptables -A FORWARD -i eth0 -o wlan0 -m state --state RELATED,ESTABLISHED -j ACCEPT- Afterwards, every time the AP is turned on, it can be started through the startw_ifi_ip.sh script. If you want it to start automatically, please add a service to implement it yourself.
admin@cp2b:~$ sudo start_wifi_ap.sh [sudo] password for admin: AIC WiFi AP started on interface wlan0 -
RE: 求助Cool pi 4b无法启动posted in Pi 4B
@15647215856
确认loader升级到最新版本,然后系统镜像通过etcher刷入TF卡,默认的启动顺序是USB TF卡 EMMC。 -
RE: Cool Pi Cm5-Laptop Linux Quick Start Guideposted in PI CM5 Laptop
@mainbord
Use the following command to generate a deb file and then install it../build-kernel.sh arm64 -
TM-CP1B backup scriptsposted in Pi Gateway CP1B/CP2B/CP3B/CP3B-P
In the process of user development, after building their own application, it is usually necessary to back up the file system and then copy it to other machines. The following provides backup scripts and operation methods:
- list itemIt is best to use a file system with a capacity greater than twice that of a USB flash drive, for example, if the file system is 4GB, choose an 8GB capacity USB flash drive and format it in NTFS format.
* Copy the script file to a USB drive.
* Insert the USB drive into the USB port of the CP1B machine and turn it on.
* Use the following command to mount a USB drive to the/mnt directory.
sudo mount /dev/sda1 /mnt
* Enter the/mnt directory and execute the script.
cd /mnt sudo ./backup-cp1b.sh
* After the script is executed, the root directory of the USB drive will generate a * * *. img file, which can be used to replace the rootfs. img file in the compressed image file.
- list itemIt is best to use a file system with a capacity greater than twice that of a USB flash drive, for example, if the file system is 4GB, choose an 8GB capacity USB flash drive and format it in NTFS format.
-
RE: 重装系统,如何操作posted in Pi CM5
@ytfycy
CM5是ARM架构的机器,不能支持X86架构的镜像文件。
如需安装ARM64架构的UBUNTU22.04镜像,请参考如下文档:
https://www.cool-pi.com/docs/coolpi-cm5-evb-quick-start-guide/ -
RE: Install Docker Engine on Ubuntuposted in Ubuntu
@george
在国内使用 Docker 拉取镜像时,经常会遇到镜像源无法访问的问题,为了解决这一问题,下面将介绍如何配置 DaoCloud 镜像源,确保在国内快速稳定的下载镜像。通过上述步骤新安装的 Docker 一般不存在文件/etc/docker/daemon.json,没关系,我们直接使用vim /etc/docker/daemon.json进行创建并编辑,输入以下内容:
{
    "registry-mirrors": [
        "https://docker.m.daocloud.io"
    ]
}
保存文件后重启 Docker 服务,新的镜像源即可生效:
systemctl daemon-reload
systemctl restart docker