@阿里 剩下的需要一组I2C,一个clk输出(可以使用有源晶体代替),1个PWD的GPIO,1个rst信号(可以使用RC上电复位)。再就是三路电源。
G
Posts
-
RE: MIPI摄像头接口定义问题posted in Pi CM5
-
电路中谁在发出啸叫的声音?posted in Hardware
1、什么是啸叫?
"啸叫"通常指的是一种高频、尖锐、持续的噪音或声音。在技术和电子领域,啸叫常常是指电路中的一种异常声音,类似于哨声或尖锐的嗡嗡声。这种声音通常是由于电路的不稳定性、振荡或其他干扰因素引起的。
在电路中,啸叫声可能是由于反馈回路、电源纹波、元件损坏、电磁干扰或其他电路问题引起的。这种声音不仅可以影响设备的正常工作,还可能是电路性能不稳定或存在故障的标志。
我们小时候,大人说电视机里面发出一种“电流的声音”,其实我们知道电流本身没有声音!声音是机械能,那么一定是振动才会导致的声音。
2、一般什么频率才会啸叫
啸叫声通常与振荡频率有关,而振荡频率又取决于电路的特性以及工作条件。一般来说,啸叫声的频率可以在听觉范围内,即20 Hz到20kHz之间。在电路中产生啸叫的频率可能在这个范围内,但具体取决于以下因素:
电路的特性: 不同类型的电路和元件有不同的频率响应。例如,某些电感和电容组合的电路可能在特定频率上振荡,导致啸叫声。
工作频率: 如果电路工作在高频范围,那么振荡和啸叫的频率可能会在听觉范围内。一些射频(无线电频率)电路或高频交流电路可能更容易产生听得到的噪声。
电源频率: 如果电源的频率或其谐波处于听觉范围内,可能会在电路中引入噪声。例如,50 Hz或60 Hz的交流电电源频率及其谐波可能引起听得到的噪声。
非线性效应: 当电路中存在非线性元件时,可能会发生频率倍增,产生高频的振荡。这些高频成分有时也可以被听到。
3、电感发声啸叫的原因
电感在电路中发出啸叫声通常是由于电感本身的特性和电路中的其他因素相互作用引起的。以下是一些可能导致电感啸叫的原因:
电感耦合振荡: 电感是一种储存电能的元件,当电流通过电感时,它会在磁场中储存能量。如果在电路中存在反馈回路,并且反馈足够强,就可能引起电感耦合振荡。这种振荡可能在可听范围内,导致啸叫声。
饱和和非线性效应: 在高频或大电流情况下,电感可能经历饱和,即磁场变得饱和并且不再线性。这会导致电感的电感值发生变化,可能引起振荡和噪声。
电感内部噪声: 电感内部可能存在一些不完美性,例如线圈之间的电容或者线圈内部的非均匀性。这些因素可能导致电感内部噪声,表现为振荡或啸叫声。
电感耦合到其他元件:如果电感与其他元件耦合,尤其是在高频电路中,可能引起电感的振荡。
4、在什么情况下电感容易啸叫
(1)大功率开关电源重载的啸叫。相信大家遇到过这种情况,开关电源在满载后突然将电源短路测试,有时会听到电源有啸叫的情况;或者是在设置电流保护时,当电流调试到某一段位,会有啸叫,其啸叫的声音抑扬顿挫,甚是烦人,究其原因主要如下:
当所带负载接近电源的输出功率极限时,开关变压器会工作在非稳态:在第一个周期由于开关管占空比过大、导通时间太长,通过变压器向后级传输了过多的能量。直流整流电路的储能电感无法在第二个周期内完全释放第一个周期存储的能量。当第三个周期到来时,电源芯片将不会让开关管导通,或者让开关管导通的占空比很小。这样,储能电感存储的能量经过第二个和第三个周期的释放,导致输出电压下降。这样,第四个周期到来时,电源芯片会驱动开关管导通过大的一个占空比……这样周而复始,就会让变压器产生低频振动,从而发出人耳可以听到的声音。电源工作在非稳态时,输出的纹波电压也比工作在正常状态时大很多。当开关管全截止的周期数在总的周期数中所占的比例达到一定占比时,电源的开关频率就从高频范围进入了音频范围,从而发出尖锐的“啸叫”。此时的变压器已经处于严重超载状态,随时可能烧毁。有些读者可能经历过电源烧毁前的“惨叫”。
(2)空载或负载很轻时。开关管也会出现间歇性的全截止周期,此时变压器也处于超载状态,可以在输出端增加假负载来解决这个问题。另外,在空载或轻载场景,变压器工作时产生的反电势无法被很好地吸收,导致很多杂波信号耦合到变压器的一次绕阻和二次绕阻。当这些杂波中的低频分量与变压器的固有振荡频率一致时,就会发生谐振。为了避免谐振频率落入音频范围,可以在电路中增加选频回路,滤除低频分量。
(3)变压器浸漆不良。包括未含浸凡立水(Varnish,即清漆)。变压器浸漆不良时,虽然带载能力一般不受影响,但会产生啸叫、输出波形有尖刺。需要注意的是,变压器的设计不良时,也可能在工作时振动产生啸叫。
(4)初级稳压电源芯片接地线走线不良。接地线走线不良时,常见的表现是概率性故障(部分产品可以正常工作,部分产品故障)。故障现象为无法带负载,甚至无法起振。
(5)光耦工作电流点走线不良。如果光耦的工作电流电阻的位置放置在次级滤波电容之前,则容易出现啸叫。负载越大,啸叫越明显。
(6)次级稳压电源芯片的接地线失误。变压器次级的基准稳压芯片的接地和初级的电源稳压芯片的接地有类似的要求:不能直接和变压器的冷地、热地相连接。如果连在一起,会导致带载能力下降并且产生啸叫。负载越大,啸叫越明显。
5、电感啸叫的案例
以图所示的DCDC降压电路图为例,来说明如何解决电感的啸叫问题。
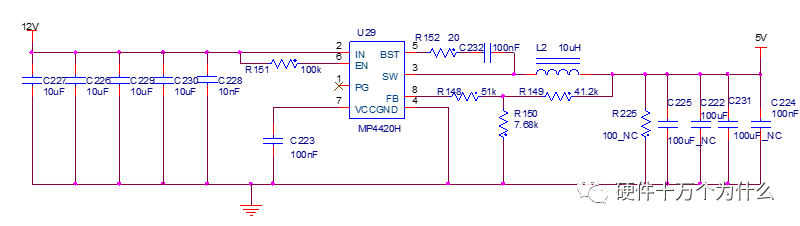
不同型号的DCDC电源芯片的开关频率不同。即使同样的外围电路,振荡频率也可能有差别,输出脉冲也有差异。如图11.1所示是MP4420芯片的典型电路。R149和R150为反馈电阻,调节R149和R150的值,可以调整输出电压VO,VO=0.792*(1+R149/R150)。
L2为输出电感,L2电感量越大,则输出纹波越小,纹波的大小还会影响到输出电压调整的灵敏度。纹波越小,灵敏度越高,输出电压越稳定。L2电感量越小,纹波越大,输出灵敏度越低,输出电压稳定度降低。
C222为输出电容,C222的ESR越小,则允许流经电容的纹波电流越大,保证电容使用寿命的同时,纹波电压也越小。另外,电容的容量越大,纹波电压也越小。
当电感线圈L2的振动频率落入音频范围(20Hz~20kHz)时,就会产生啸叫。MP4220的输出稳压是以PWM方式实现的,当电路负载较小时,输出方波脉宽变窄,即占空比变小。当电路负载小于某个数值时,无法继续调整占空比。为了实现输出稳压,不同的芯片采用的方案不同:有的芯片通过降低开关频率来实现;有的芯片通过周期性的丢弃一些脉冲来实现。不管是降开关低频率还是周期性丢弃脉冲,如果调整后的开关电流的频率落入音频范围,就会产生啸叫。
解决啸叫问题的方法就是避免开关频率落在20Hz~20kHz范围内。方法有多种,具体如下。
①可以在EN管脚外接一个时钟源来控制使能,改变电源开关频率,避免开关电流频率落入音频范围,从而避免电感的啸叫。
②改善电感L2的工艺(如灌胶或增加浸漆工序等),减小振动。
③在纹波允许范围内,适当加大纹波幅度。如果需要,可以多加一级滤波。
实测电路图和波形如图
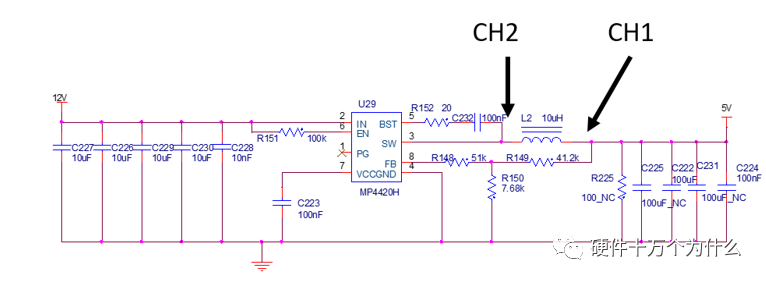
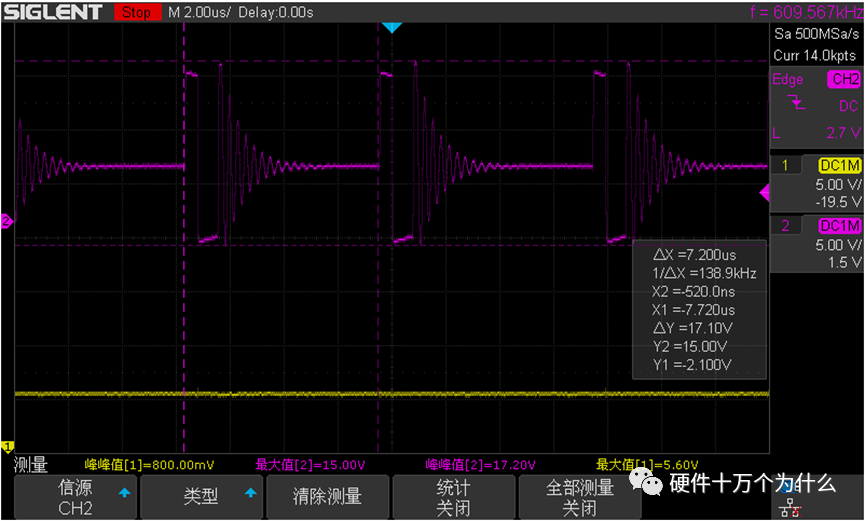
MP4220在低负载的场景下进入了“节能模式”,开关频率从410kHz降低到了138kHz。如果进一步降低负载,开关频率落入20Hz~20kHz范围,电感就会产生啸叫。
为了解决啸叫,只能选择没有节能模式的芯片或者给电路一个假负载。
6、陶瓷电容的啸叫
陶瓷电容在某些情况下也可能产生啸叫声,这通常与电容器本身的特性以及工作环境有关。以下是一些可能导致陶瓷电容产生啸叫声的原因:
压电效应:陶瓷电容中的一些材料可能具有压电效应,即在电场作用下发生形变,从而产生声波。这种效应可能在电容器受到电场作用时引起物理振动,导致听得到的声音。
共振:陶瓷电容可能在特定频率下发生共振,导致振动并产生声音。这通常与电容器的结构、材料和工作频率有关。
电压和电流的交互作用:在某些情况下,陶瓷电容可能由于电压和电流的交互作用而产生噪声。这可能是由于电容器在电路中的特定工作条件下引起的。
电磁振荡:电容器可能受到附近电路中电感元件的影响,导致电容器自身发生振荡。这种振荡可能产生听得到的噪声。
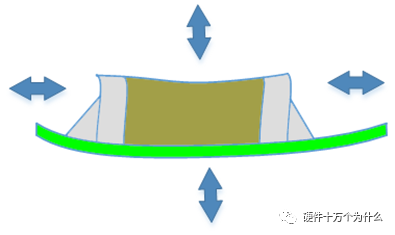
MLCC发出啸叫声音,那么MLCC一定是发生了振动,并且这个频率是在人耳能够分辨的频率范围之内。MLCC在电压作用下发生一定幅度的振动,达到了人耳能都听到的振幅。
那么MLCC为什么会振动?我们要先了解一种自然现象——电致伸缩。在外电场作用下,所有的物质都会产生伸缩形变——电致伸缩。对于某些高介电常数的铁电材料,电致伸缩效应剧烈,称为压电效应。压电效应包括正压电效应和逆压电效应。
正压电效应:对具有压电特性的介质材料施加机械压力,介质晶体会发生结构重组排布,材料表面会感应出电荷,产生电位差。
逆压电效应:对具有压电特性的介质材料施加电压,则产生机械应力,发生形变。
压电效应的定义:在没有对称中心的晶体上施加压力、张力和切向力时,则发生与应力成比例的介质极化,同时在晶体两端面将出现正、负电荷,这一现象称为正压电效应。反之在晶体上施加电场而引起极化,则产生与电场强度成比例的变形或机械应力,这一现象称为逆压电效应。这两种正、逆压电效应统称为压电效应。
那所有MLCC都会啸叫吗?MLCC设计制造陶瓷介质材料主要有顺电介质和铁电介质两大类。
顺电介质,即Ⅰ类介质,主要有SrZrO3、MgTiO3等。顺电介质电致伸缩形变很小,在工作电压下,不足以产生噪声。所以,顺电介质(Ⅰ类介质)材料做的MLCC,如NP0(C0G)等温度稳定性产品,就不会产生噪声啸叫。
铁电介质,即 Ⅱ类介质,主要BaTiO3、BaSrTiO3等。铁电介质具有强烈的电致伸缩特性—压电效应。因此,铁电介质(Ⅱ类介质)做的MLCC,如X7R/X5R特性产品,在较大的交流电场强度作用下会产生明显的噪声啸叫。
哪些场合MLCC啸叫明显?较大的交变电压,频率在20Hz到20kHz之间,使用X7R/X5R类中高容量MLCC,会产生明显的啸叫,如开关电源、高频电源等场合。啸叫还有很多危害,许多移动电子设备靠近人耳,如笔记本电脑、平板电脑、智能手机等,如电子电路中有可听噪声会影响使用感受。剧烈的啸叫除了令人生厌外,还可能存在着可靠性设计不足的隐患。剧烈的啸叫源于剧烈的振动,振动幅度由压电效应程度决定。压电效应与电场强度成正比,外加电压不变,介质越薄,压电效应越强,啸叫声音越大。
降低MLCC电容器产生的可听噪声的方法有很多,所有解决方案都会增加成本。那么解决啸叫有哪些对策呢?
(1)改变电容器类型是最直接的方法,用Ⅰ类MLCC、钽电容和薄膜电容等不具有压电效应的电容器替代。但需要考虑体积空间、可靠性和成本等问题。
(2)调整电路,将加在MLCC大的交变电压消除或将其频率移出人耳听感频段(人耳最敏感音频为1KHz~3KHz)。
(3)MLCC由于自身体积较小,其自身振动引起的噪声其实是比较小的 。我们主要要放置MLCC带动PCB一起振动。所以,在PCB设计时,需要考虑MLCC的PCB布局,不要将可能产生啸叫的MLCC放置在PCB应力较弱,PCB容易被振动的位置,从而帮助降低啸叫水平。
(4)加厚MLCC底部保护层。
由于保护层厚度部分是没有内电极的,这部分的BaTiO3陶瓷不会发生形变,当两端的焊锡高度不超过底保护层厚度,这时产生的形变对PCB影响要小,有效地降低噪声。如图
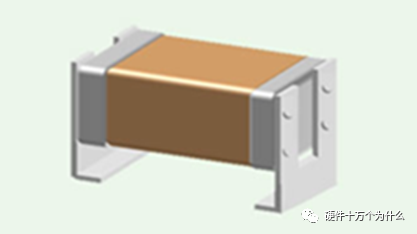
(5)附加金属支架结构。
金属支架结构如图所示,它采用金属支架把MLCC芯片架空。MLCC架空之后与PCB板不直接接触,把逆压电效应产生形变通过金属支架弹性缓冲,振动的能量减少传递给PCB板,减小啸叫。
(6)使用压电效应弱的介质材料设计制造。
通过对钛酸钡(BaTiO3)进一步掺杂得到压电效应大大减弱的介质材料,用其制造的MLCC可有效地降低噪声。但是这样会牺牲一定的介电常数和温度特性,各MLCC厂家都有相应低噪材质的MLCC产品。
7、啸叫有可能是晶振产生的么?
晶振(Crystal Oscillator)通常是一种稳定的时钟源,其设计旨在提供高度准确和稳定的时钟信号。晶振通常不会产生听得到的噪声或啸叫声,因为它们的设计目的是提供频率精度和稳定性。
然而,在一些特殊情况下,可能会发生一些问题,导致晶振产生异常噪声。一些可能导致晶振啸叫声的原因包括:
振荡器回路问题:如果晶振的振荡器回路中存在不稳定性,可能导致振荡频率不稳定或产生啸叫声。
电源噪声:如果晶振的电源电压不稳定或受到干扰,可能引入电源噪声,进而影响晶振的性能。
环境电磁干扰:强电磁场可能对晶振产生干扰,导致性能问题或产生额外的噪声。
晶体老化或损坏:如果晶振的晶体元件发生老化或损坏,可能影响其振荡性能。
要解决可能导致晶振产生噪声的问题,可以考虑以下措施:
优化电源:确保提供给晶振的电源电压是稳定的,并且没有过多的纹波或噪声。
检查振荡器回路:仔细检查晶振的振荡器回路,确保电路设计正确且稳定。
防止电磁干扰:在设计中采取措施,如屏蔽或隔离,以减少电磁干扰对晶振的影响。
检查晶体状态:检查晶振的晶体元件是否正常,没有老化或损坏。
总体而言,正常工作的晶振应该是不会产生啸叫声的。如果出现异常噪声,建议仔细检查电路和环境因素,可能需要进一步地调试和优化。
-
Ubuntu22.04安装Fcitx5中文输入法posted in Ubuntu
-
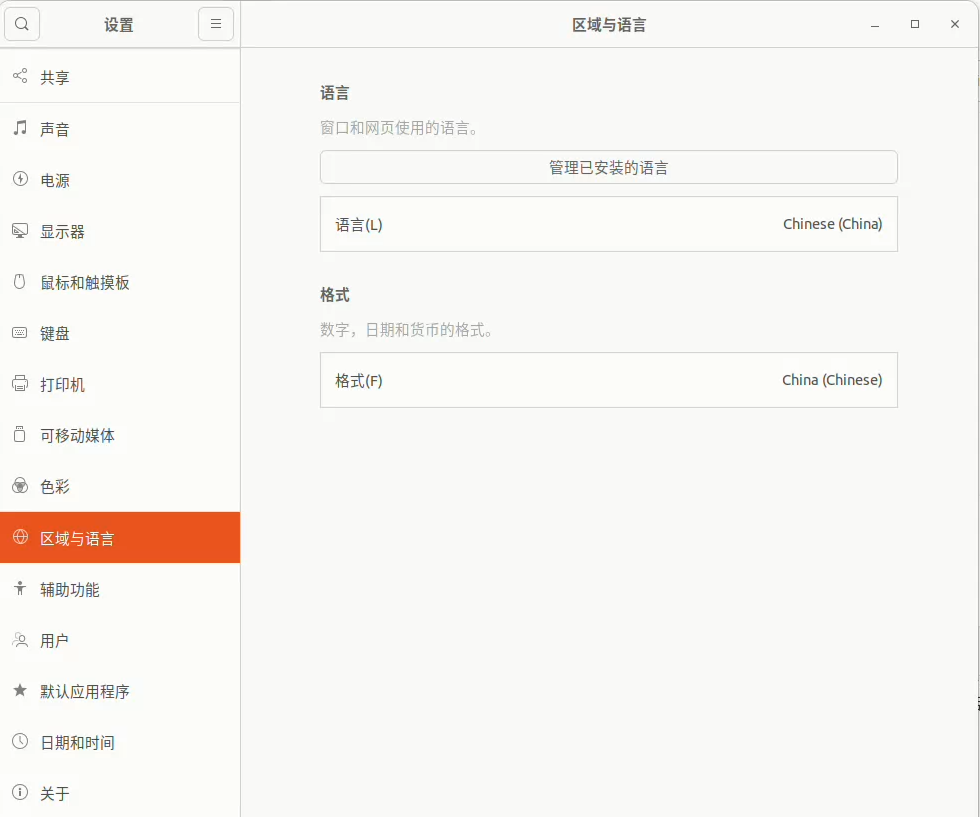
检查系统中文环境
在 Ubuntu 设置中打开「区域与语言」—— 「管理已安装的语言」,然后会自动检查已安装语言是否完整。若不完整,根据提示安装即可。
-
最小安装
为使用 Fcitx 5,需要安装三部分基本内容:
Fcitx 5 主程序
中文输入法引擎
图形界面相关
按照这个思路,可以直接使用 apt 进行安装:
sudo apt install fcitx5 fcitx5-chinese-addons fcitx5-frontend-gtk4 fcitx5-frontend-gtk3 fcitx5-frontend-gtk2 fcitx5-frontend-qt5- 安装中文词库
# 下载词库文件 wget https://github.com/felixonmars/fcitx5-pinyin-zhwiki/releases/download/0.2.4/zhwiki-20220416.dict # 创建存储目录 mkdir -p ~/.local/share/fcitx5/pinyin/dictionaries/ # 移动词库文件至该目录 mv zhwiki-20220416.dict ~/.local/share/fcitx5/pinyin/dictionaries/- 配置
设置为默认输入法
使用 im-config 工具可以配置首选输入法,在任意命令行输入:
im-config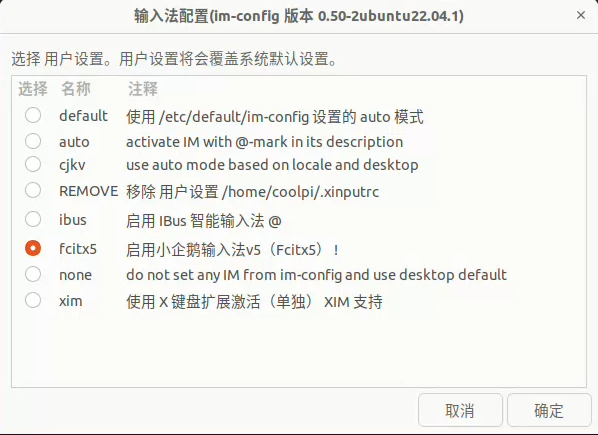
根据弹出窗口的提示,将首选输入法设置为 Fcitx 5 即可。- 开机启动fcitx5
sudo cp /usr/share/applications/org.fcitx.Fcitx5.desktop /etc/xdg/autostart/ -
-
RE: An error occurs when converting the yolo v8 model to onnx and then to rknn.posted in AI Algorithm
@etrin
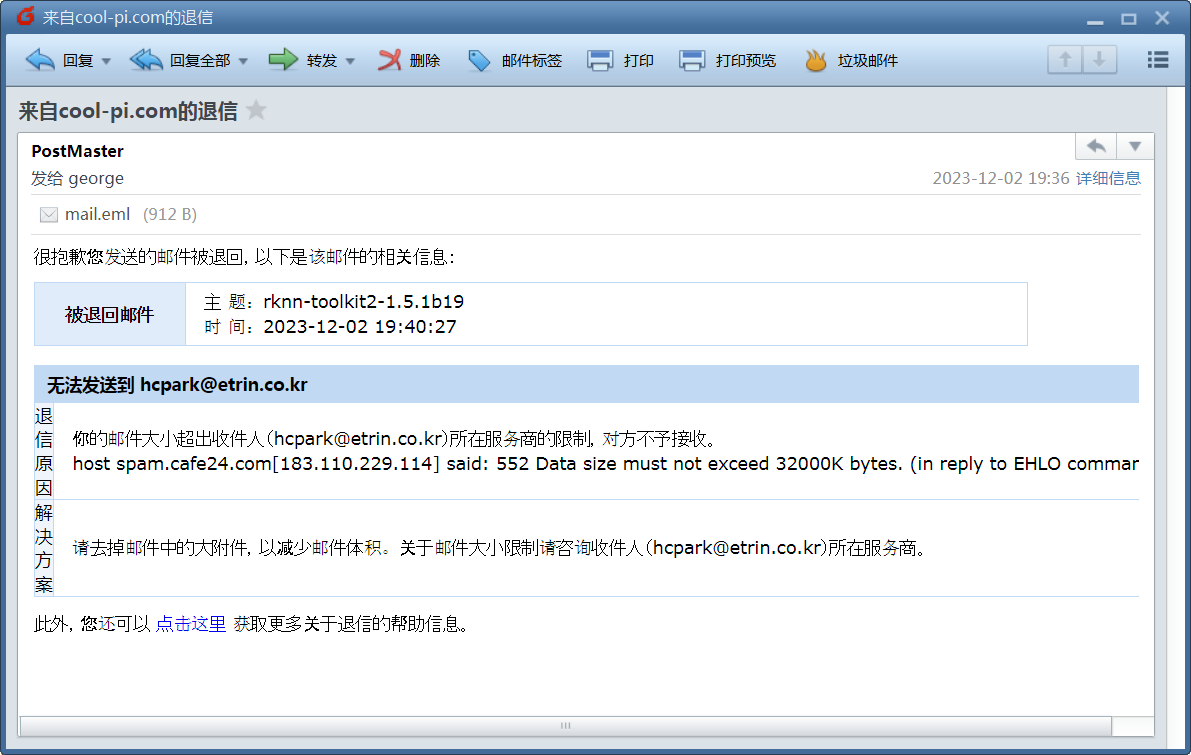
Due to the large size of the attachment, the service provider is unable to deliver it. I will upload the latest tool to OneDrive and provide the address for download later.
-
RE: An error occurs when converting the yolo v8 model to onnx and then to rknn.posted in AI Algorithm
@etrin
I have emailed you the latest RKNN tool, please use the most detailed tool for conversion. -
RE: Laptop USB-C Alt Modeposted in Pi CM5
@anernest
Refer to the following document to provide EDID information and demesg information for inserting and removing HDMI.
https://www.cool-pi.com/topic/296/how-to-drive-non-standard-resolution-hdmi-displays?_=1701475254750 -
RE: HDMI Port Disconnectedposted in PI CM5 Laptop
@anernest
Is there any abnormality when connecting HDMI or TYPEC separately? -
RE: 关于CP5底板无法启动问题posted in Pi CM5
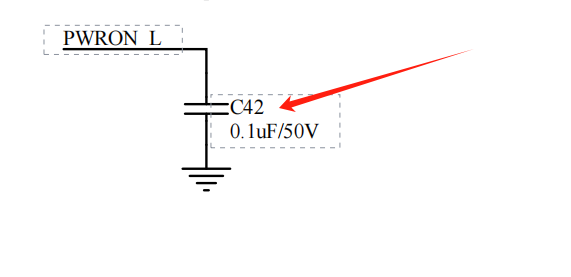
@qys2022
如下图所示C42的电容短接,观察串口有没有输出。怀疑D1二极管是不是贴反了?然后DTS里边要关闭PCIE3.0部分配置,否则系统也无法启动。
-
RE: Laptop USB-C Alt Modeposted in Pi CM5
@anernest
Sorry, the TYPEC interface of RK3588 does not support DP MST mode. You can expand up to one HDMI and one TYPEC display terminal, and with the machine's own eDP screen, you can achieve three different displays. If you need to implement two fully functional TYPEC interfaces and two HDMI terminals, you can consider customizing a CM5 core board motherboard. If you have some hands-on ability, we are willing to cooperate with you to achieve it. Thank you for your support of Coolpi. -
RE: Please tell me how to convert YOLO v8 to RKNN?posted in AI Algorithm
@etrin
Please refer to the following document to complete the model conversion.
https://github.com/rockchip-linux/rknn-toolkit -
RE: ARM Laptop screen upgradeposted in Pi CM5
-
Thank you very much for your support of Coolpi products. If you have a certain level of hands-on ability, the screen can be upgraded. Currently, the designed screen has a standard EDP interface, which allows for adaptive resolution without software modification, and can reach a maximum resolution of 4K (3840 * 2160). The difficulty here is the wiring issue. Currently, the LCD interface of FHD is eDP (2line) 30PIN, and most 2K 4K screens require EDP (4line) 40PIN, so upgrading requires modifying the wiring. If you are not in a hurry, we will arrange to customize a 2K 4K universal 40pin ribbon cable.
-
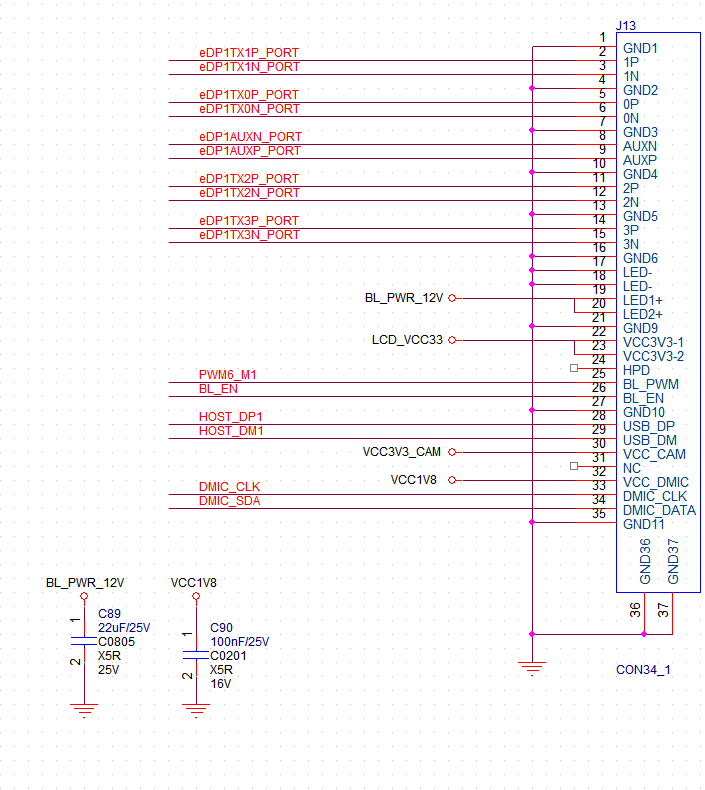
Currently, in addition to the LCD of the machine itself, we have also adapted a touch LCD, and the ribbon cables have been customized.
-
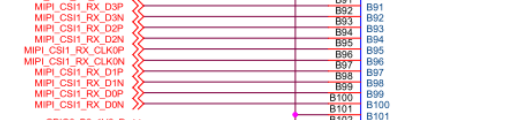
The PIN definition on the motherboard end is shown in the following figure:
-
-
RE: CoolPi 4b Ubuntu gst拉取usb摄像头不稳定,经常断开posted in Pi 4B
@edwardzhou
从log信息看USB设备还是有兼容性问题,识别的时候有报错,如果手上有USB hub可以串接hub再测试。或者换一个USB摄像头模组确认一下问题。 -
RE: 可不可以把emmc中的系统通过dd指令备份到tf卡中,随后在新的coolpi板子上只插入tf卡实现系统迁移?posted in Pi 4B
@hangman 可能是读卡器兼容性问题,之前有测试过的读卡器如下链接:【淘宝】https://m.tb.cn/h.5kZgqBq?tk=DvWdWeDZbHp CZ3457 「SD卡TF卡USB3.0高速二合一读卡器手机相机内存卡行车记录仪GL3224」
点击链接直接打开 或者 淘宝搜索直接打开 -
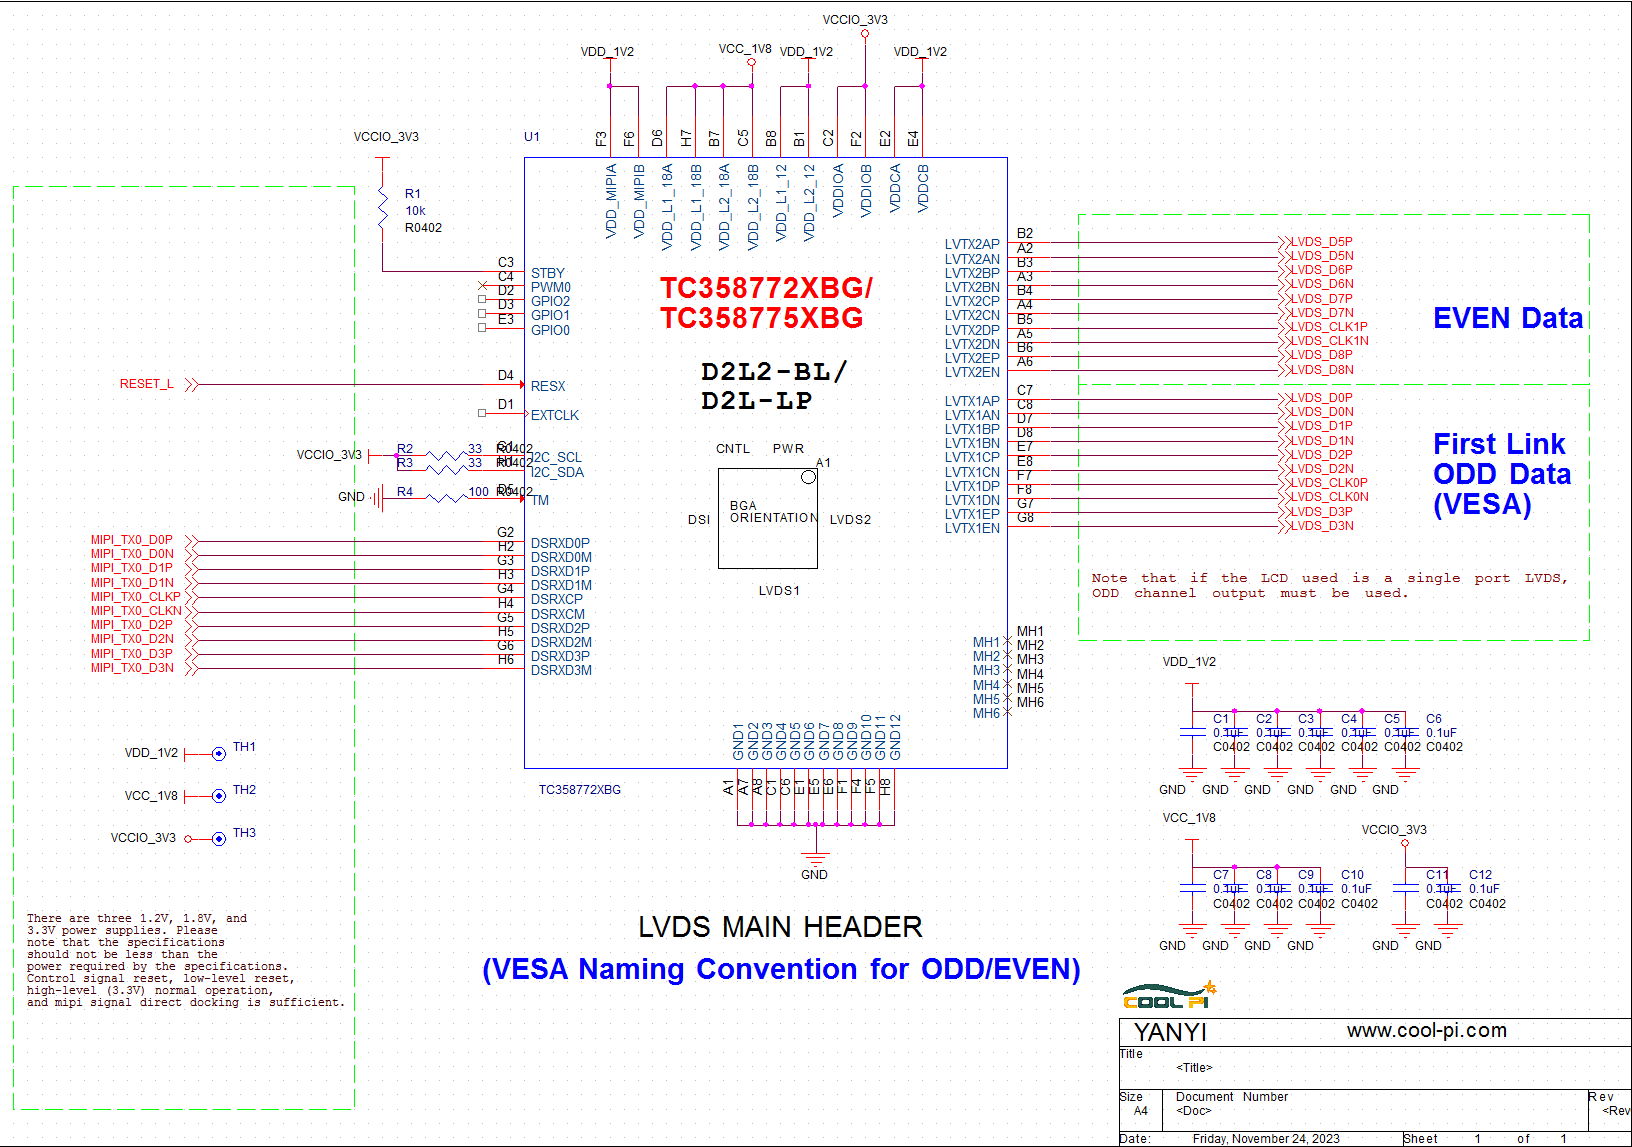
RE: CM5 LVDSposted in Pi CM5
@Xelef2000 The CM5-EVB machine itself does not have an LVDS interface. If you need to implement it, you can use the MIPI interface to transfer it. The optional chips include TC358775 GM8775 LT9211. From the test results, the compatibility of the winter solstice chips is the best. If you need detailed information, please leave a message and organize a copy later.